
To embed a live stream on your website, you simply need to copy the iframe embed code from your hosting provider and paste it into your site’s HTML or CMS editor. While basic embedding is straightforward, professional creators use DRM-encrypted embedding to prevent unauthorized recording and link sharing. This guide covers the step-by-step process for WordPress, Wix, and Shopify, ensuring your live broadcast remains secure, high-quality, and protected from piracy.
What is Video Embedding?
Understanding the Concept of Video Embedding
Video embedding is integrating video content from one platform directly into your website. Instead of hosting the video file on your server, you link to a video hosted elsewhere, displaying it seamlessly within your site’s pages. This technique allows visitors to watch the video without leaving your site, providing a smooth and integrated user experience.
Embedded videos are typically hosted on platforms like YouTube and Vimeo, and specialized services such as Inkrypt Videos offer advanced features tailored for businesses and content creators. By using embed codes provided by these platforms, you can easily incorporate videos into your website’s HTML, maintaining control over how and where the content appears.
Difference Between Hosting and Embedding Videos
While both hosting and embedding involve displaying video content on your website, they function differently:
- Hosting Videos: This involves uploading video files directly to your website’s server. While it gives you complete control over the content, it can significantly slow down your site due to large file sizes and increased bandwidth usage. Managing video playback compatibility across different browsers and devices can also be challenging.
- Embedding Videos: Here, the video is hosted on an external platform, and you integrate it into your site using a simple embed code. This method is more efficient as it reduces the load on your server, ensures better playback performance, and provides access to additional features like analytics and customization options offered by the hosting platform.
The Importance of Video Content for Your Website
Enhancing User Engagement and Retention
Video content is incredibly effective at capturing and retaining audience attention. Studies show that users spend significantly more time on websites with video content than those without. Videos are engaging, easily digestible, and can convey complex information quickly and effectively.
By embedding videos on your website, you provide a rich media experience that encourages visitors to explore more and stay longer, reducing bounce rates and improving overall engagement.
Boosting Search Engine Optimization (SEO)
Search engines prioritize websites that offer valuable and engaging content, and videos play a crucial role. Embedding relevant and high-quality videos can improve your site’s SEO by:
- Increasing Dwell Time: Longer visitor sessions signal to search engines that your content is valuable and relevant.
- Generating Backlinks: Quality video content is more likely to be shared and linked to by other sites, enhancing your site’s authority.
- Enhancing Keyword Opportunities: Video titles, descriptions, and transcripts provide additional avenues to incorporate essential keywords and improve search rankings.
By leveraging video content strategically, you can significantly enhance your website’s visibility and attract more organic traffic.
Strengthening Brand Messaging and Credibility
Videos are a powerful medium for storytelling and conveying your brand’s personality. They allow you to showcase products, share customer testimonials, provide tutorials, and more engagingly and memorably. Embedding professional and well-crafted videos helps build trust and credibility with your audience, making your brand more relatable and authentic.
Benefits of Embedding a Video on Your Website
Improved Website Performance and User Experience
Embedding videos, as opposed to hosting them directly, offers several performance benefits:
- Faster Loading Times: Since the video content is hosted externally, it does not weigh down your website, ensuring quicker page loads and a smoother user experience.
- Cross-Platform Compatibility: Embedded videos are optimized to play across various devices and browsers, providing consistent viewing experiences for all users.
- Scalability: As your video content library grows, embedding allows easy management without compromising site performance.
Access to Advanced Features and Analytics
When you embed videos from platforms like Inkrypt Videos, you gain access to a suite of advanced features:
- Customization Options: Tailor the video player to match your brand’s aesthetics with customizable skins, colors, and controls.
- Interactive Elements: Incorporate calls to action, annotations, and interactive overlays to drive engagement and conversions.
- Detailed Analytics: Track viewer behavior, engagement metrics, and performance data to inform your content strategy and make data-driven decisions.
Enhanced Social Sharing and Reach
Embedded videos often come with built-in social sharing functionalities, making it easy for viewers to share your content across various platforms. This amplifies your reach, drives more traffic back to your website, and increases brand exposure. Engaging video content is more likely to be shared, commented on, and viral, creating valuable opportunities for organic growth.
To embed a live stream on your website, you simply need to copy the iframe embed code from your hosting provider and paste it into your site’s HTML or CMS editor. While basic embedding is straightforward, professional creators use DRM-encrypted embedding to prevent unauthorized recording and link sharing. This guide covers the step-by-step process for WordPress, Wix, Squarespace, and Shopify, ensuring your live broadcast remains secure, high-quality, and protected from piracy.
Streaming to your own website — instead of relying only on YouTube or Facebook — keeps viewers on pages you control, lets you monetize the broadcast on your own terms, and gives you one permanent destination for every past and future live event. Social platforms are still useful for discovery, but the website embed is what turns viewers into subscribers, students, or customers.
What Is Live Stream Embedding?
Live stream embedding means displaying a live video broadcast directly on your webpage using a small piece of code, instead of sending visitors to YouTube, Twitch, or another platform to watch it. The stream itself is still hosted and delivered by that platform — or a dedicated live streaming service like Inkrypt Videos — your site simply displays it through an embed code, so viewers never have to leave your page.
Hosting vs. Embedding
- Hosting a live stream means running the video infrastructure yourself — encoding, delivering, and scaling the broadcast from your own server. This gives you full control but requires serious bandwidth and technical overhead most websites aren’t built for.
- Embedding a live stream means a specialized platform handles the encoding, delivery, and scaling, while your website just displays the player through an embed code. This is faster to set up, cheaper to run, and the approach nearly every business and creator uses.
Why Embed a Live Stream on Your Own Website
Embedding a live stream on your own website — rather than only streaming to social platforms — pays off in three concrete ways: it keeps visitors on your site longer, it improves your SEO, and it gives you full control over monetization and branding.
It Keeps Visitors on Your Site Longer
A live broadcast is one of the most effective ways to hold attention. Visitors who arrive to watch a stream tend to stay on the page for its full duration, which lowers bounce rate and signals to search engines that your content is worth ranking.
It Improves Your SEO
Search engines reward pages that keep visitors engaged. A well-embedded live stream contributes to that in three ways:
- Longer sessions: Extended dwell time is a positive engagement signal.
- More backlinks: Valuable live content gets shared and linked to more than static pages.
- More keyword opportunities: Stream titles, descriptions, and post-event transcripts give you additional places to target relevant search terms.
It Puts You in Control of Monetization and Branding
When you stream on Facebook, YouTube, or LinkedIn, you’re playing by that platform’s monetization rules — and sending your audience there instead of to you. When you embed the stream on your own website, you decide how (or whether) to charge for access, what the player looks like, and where the traffic goes afterward. Platforms like Inkrypt Videos add DRM encryption and access controls on top of that, so the broadcast stays secure while you keep full ownership of the audience.
How Does Live Stream Embedding Work?
The Technical Process Behind Live Stream Embedding
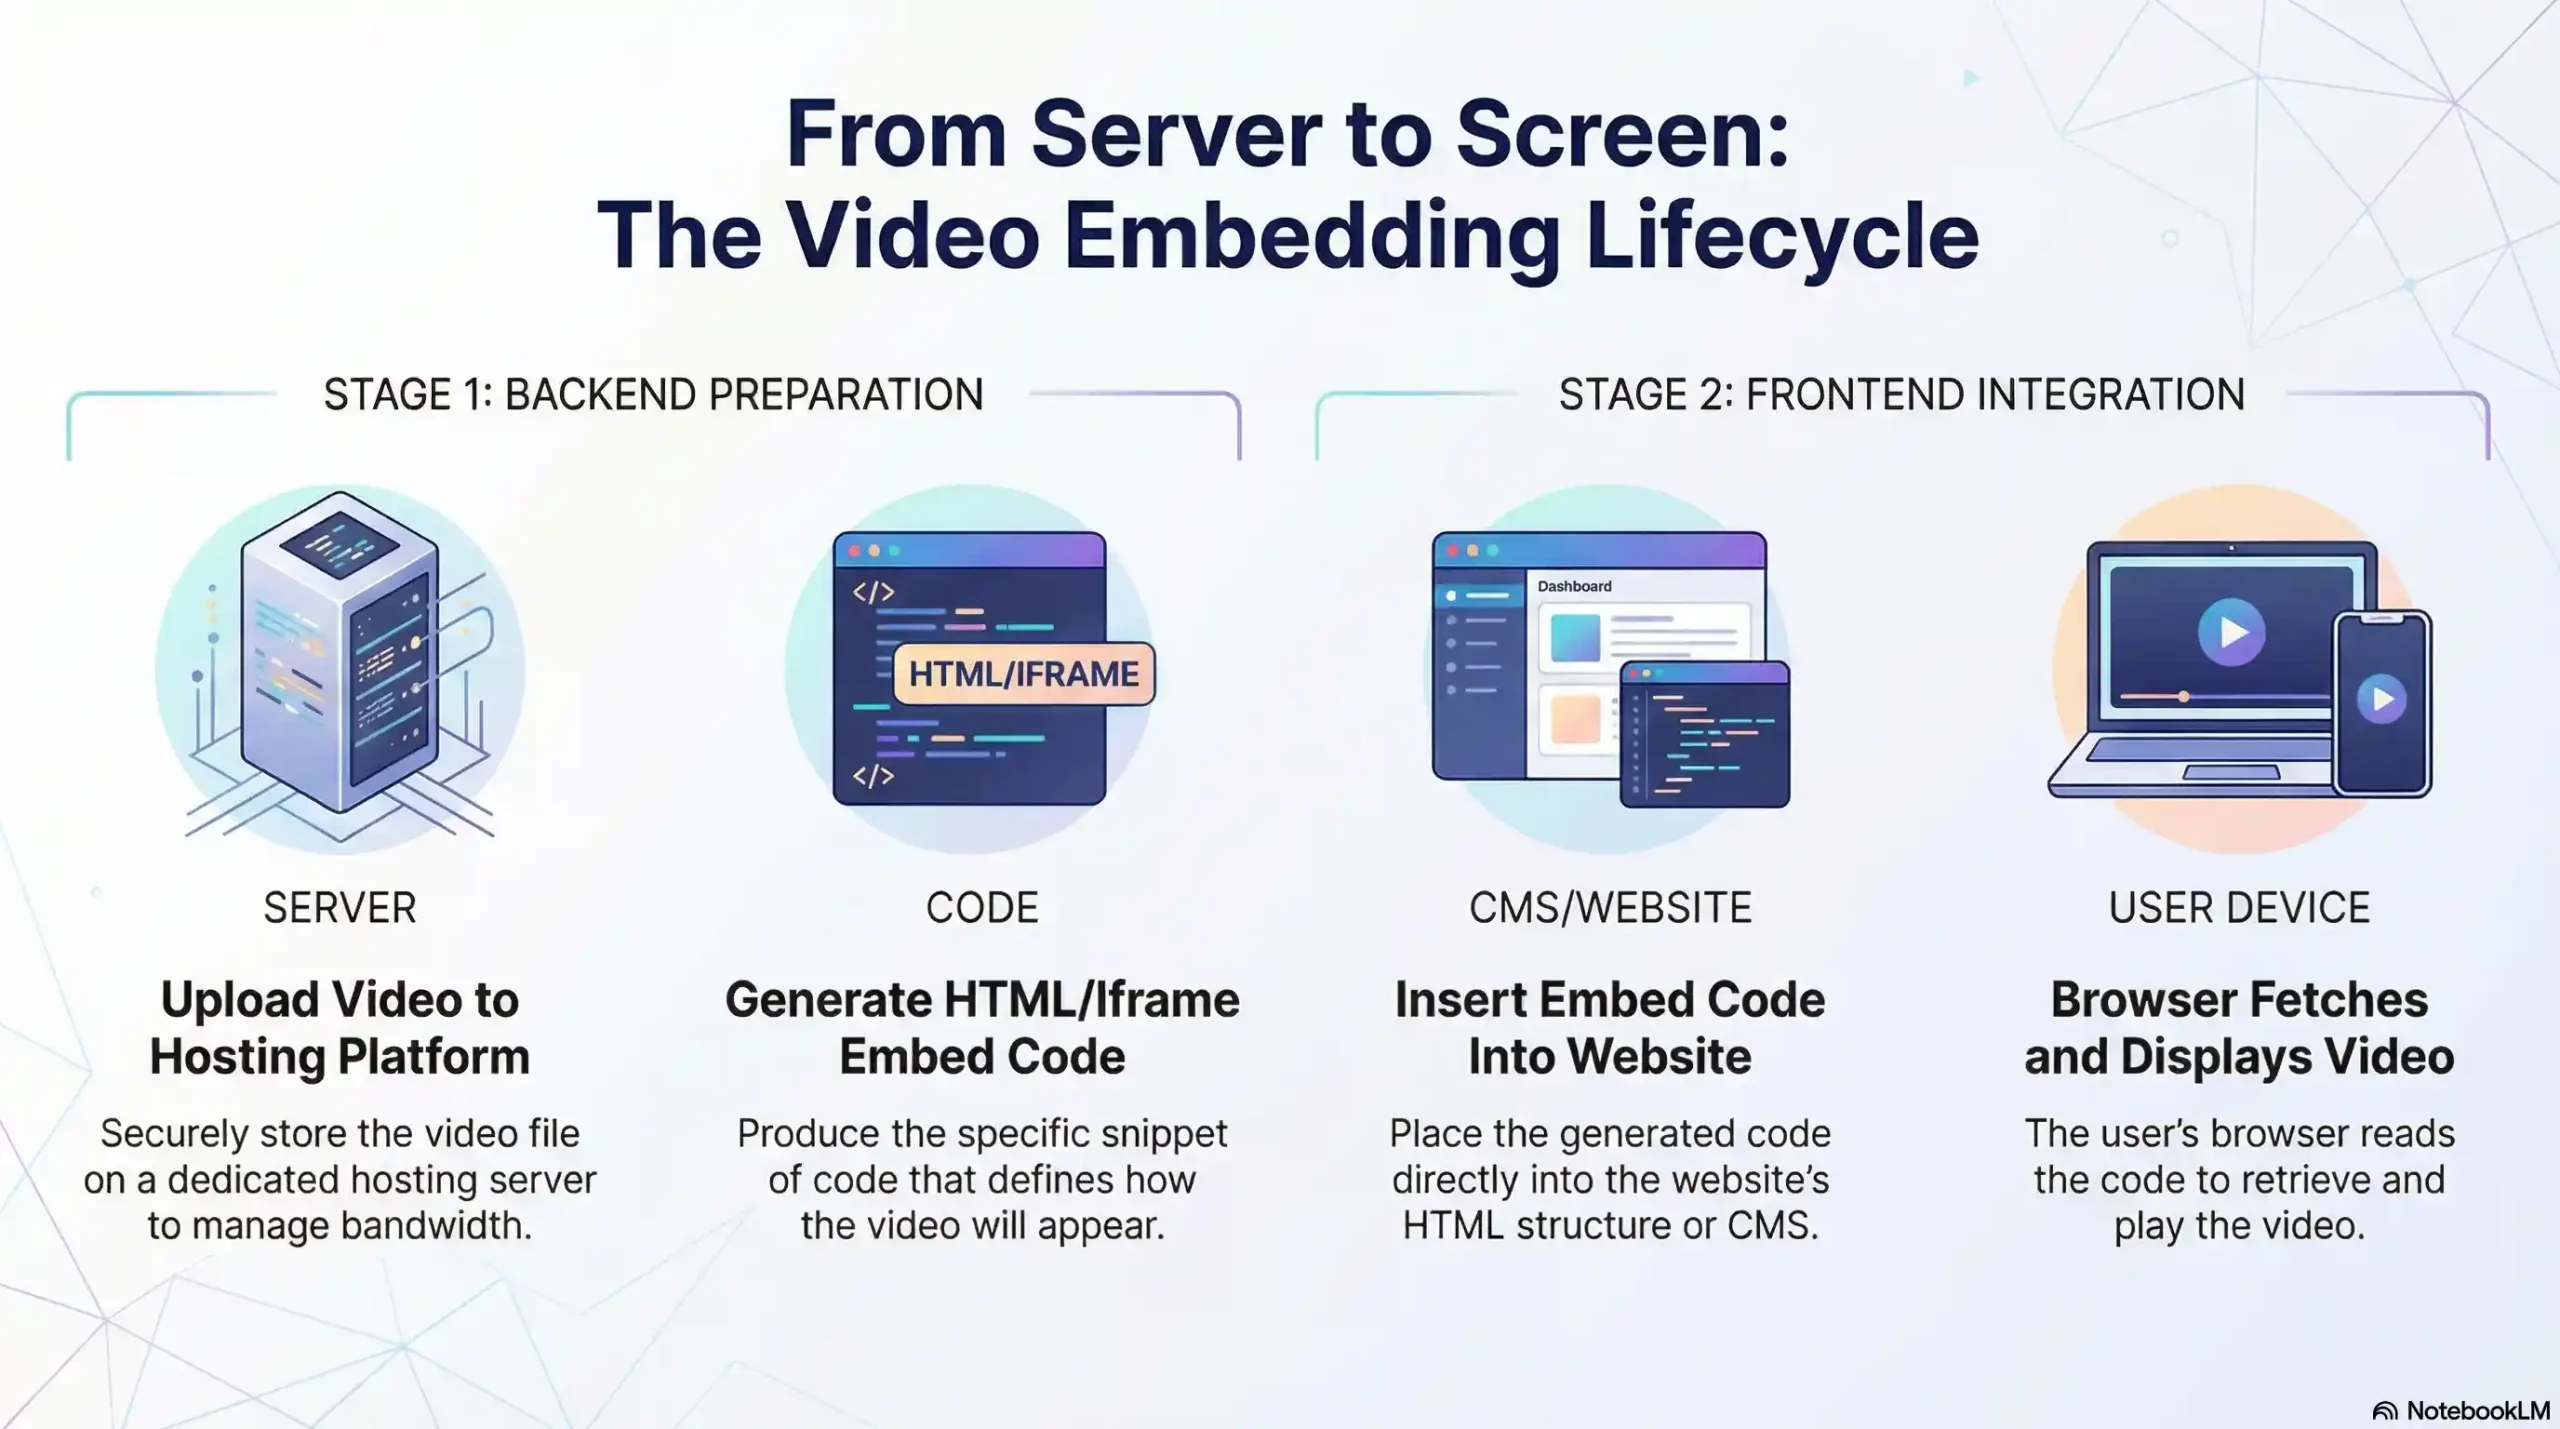
Embedding works by inserting a snippet of code into your website’s HTML that tells the browser where to pull the live video from and how to display it. Here’s the process:
- Start or Upload Your Live Stream: Go live using a streaming service such as Inkrypt Videos, YouTube Live, or Twitch.
- Generate the Embed Code: The platform provides an embed code — typically an iframe — that contains the stream’s source and display settings.
- Paste the Code Into Your Website: Insert it into your site’s HTML where you want the live player to appear.
- The Browser Displays the Stream: When a visitor loads the page, their browser reads the embed code, pulls the live video from the source platform, and plays it inline on your site.
Understanding Embed Codes and Their Components
An embed code is a small piece of HTML — usually an <iframe> tag — that tells the browser exactly how to display the stream. Here’s what a typical live stream embed code looks like:
<iframe
  src="https://player.example.com/live/your-stream-id"
  width="640"
  height="360"
  frameborder="0"
  allow="autoplay; fullscreen"
  allowfullscreen>
</iframe>
Key components:
src: The source URL — where the live stream is actually hosted.width/height: The size of the video player on your page.allow/allowfullscreen: Which player features are enabled, such as autoplay and fullscreen.- Additional attributes: Styling, captions, or branding options vary by platform.
Every platform generates this code slightly differently, but the structure above is what you’re working with no matter which one you choose. Some platforms — including Inkrypt’s Smart HTML5 Player — also offer a JavaScript embed option instead of a plain iframe, which loads faster and supports more advanced player customization.
Step-by-Step Guide to Embedding a Live Stream on Your Website
Choosing the Right Live Streaming Platform
Selecting the appropriate platform is crucial for a seamless embedding experience.
Is your live stream protected?
See how Inkrypt’s DRM prevents unauthorized sharing and screen recording.
Consider the following factors when choosing a live-streaming service:
- Ease of Use: The platform should offer straightforward tools for setting up and managing live streams.
- Embedding Capabilities: Ensure it provides customizable and responsive embed codes that are compatible with your website.
- Reliability and Performance: Opt for platforms with robust infrastructure to handle high traffic and ensure uninterrupted streaming.
- Advanced Features: Look for additional functionalities like real-time analytics, interactive elements, and security controls.
Inkrypt Videos is an excellent choice, offering a comprehensive suite of features tailored for seamless live streaming and embedding.
Setting Up Your Live Stream for Embedding
Creating and Configuring Your Live Stream
- Sign Up or Log In: Access your account on your chosen streaming platform, such as Inkrypt Videos.
- Create a New Live Stream: Navigate to the live streaming section and start a new stream.
- Configure Stream Settings:
- Title and Description: Use keyword-rich titles and detailed descriptions to help with SEO.
- Quality Settings: Choose resolution and bitrate based on your audience’s typical connection speed.
- Privacy Controls: Set the stream to public, private, or unlisted.
- Test Your Stream: Run a test broadcast to confirm audio and video quality before going live.
Generating and Customizing the Embed Code
- Access the Embed Code: Once your stream is set up, locate the embed code the platform provides (see the example above).
- Customize the Display: Adjust width and height to fit your layout, choose which player controls to show, and decide whether the stream should autoplay.
- Copy the Code: Copy the finished embed code — you’ll paste it into your website in the next step.
How to Get Your Embed Code From Popular Live Streaming Platforms
The exact steps for pulling an embed code differ by platform. Here’s how to get it from the services people ask about most:
YouTube Live
- Go to YouTube Studio and open Live in the left-hand menu, or go directly to the video of your stream.
- Once your stream is live (or scheduled), click Share below the video player.
- Select Embed from the share options.
- YouTube generates an
<iframe>embed code automatically — click Copy to copy it to your clipboard. - Paste the code into your website’s HTML wherever you want the live player to appear.
Twitch
- Open your channel at
twitch.tv/your-channel-namewhile you’re live. - Click the Share icon below the video player.
- Select Embed.
- In the “Using an iframe” section, copy the provided embed code.
- Paste it into your website’s HTML. Twitch’s embed code requires you to add your site’s domain to the
parentparameter, or the player won’t load — don’t skip this step.
Facebook Live
- Go to the Facebook post or Page containing your live video.
- Click the three-dot menu on the video and select Embed.
- Facebook generates an embed code — copy it.
- Paste it into your website’s HTML. Facebook’s embed relies on the Facebook SDK, so you’ll also need to add Facebook’s JavaScript SDK snippet once on the page for the player to render.
Inkrypt Videos
- Log in to your Inkrypt Videos dashboard and open the live stream you want to embed.
- Go to the Sharing or Embed section for that stream.
- Choose between the standard iframe embed or the DRM-protected embed, which adds encryption and domain restrictions so the stream can’t be copied or replayed elsewhere.
- Copy the generated code and paste it into your website’s HTML.
Each platform’s embed code follows the same basic structure shown earlier in this guide — only the source URL and a few parameters change.
Embedding the Live Stream on Popular Website Builders
Embedding on WordPress
- Navigate to Desired Page/Post: In your WordPress dashboard, select the page or post where you want to embed the live stream.
- Switch to Text/HTML Editor: Access the HTML editor on the ‘Text’ tab.
- Paste Embed Code: Insert the copied embed code where you want the live stream to appear.
- Preview and Publish: Preview the changes to ensure proper display and functionality, then publish or update the page.
If you’re self-hosting videos alongside your live streams, worth a read: why self-hosting your course videos on WordPress carries real security risk.
Embedding on Wix
- Open Wix Editor: Log in to your Wix account and access the website editor.
- Add HTML Embed Element: Click ‘Add’ > ‘More’ > ‘HTML iframe’ to insert an embed box.
- Insert Embed Code: Click ‘Enter Code’ and paste your customized embed code.
- Adjust and Publish: Resize and position the embed box as needed, then publish your changes.
Embedding on Squarespace
- Edit Desired Page: In your Squarespace dashboard, select the page where you want to embed the live stream.
- Add Code Block: Click the ‘+’ icon and select ‘Code’ from the block options.
- Paste Embed Code: Insert your embed code into the code block and apply changes.
- Save and Publish: Review the embedded live stream for proper functionality, then save and publish your page.
Embedding on Shopify
- Access Theme Editor: From your Shopify admin, go to ‘Online Store’ > ‘Themes’ > ‘Customize.’
- Select Page and Add Section: Choose the page you wish to edit and click ‘Add Section’ where you want the live stream.
- Insert Custom HTML: Select ‘Custom Content’ or ‘Custom HTML’ and paste your embed code.
- Save Changes: Preview the embedded live stream and save your changes to make it live on your store.
How to Improve an Embedded Live Video
Enhancing Video Quality and Reliability
Utilize High-Quality Equipment
- Invest in Good Cameras and Microphones: High-definition visuals and clear audio significantly enhance viewer experience.
- Ensure Proper Lighting: Adequate and balanced lighting improves video clarity and professionalism.
- Use Stable Internet Connection: A robust and reliable internet connection prevents buffering and stream interruptions.
Optimize Streaming Settings
- Adjust Resolution and Bitrate: Balance quality and performance by selecting appropriate settings based on your audience’s bandwidth.
- Enable Adaptive Streaming: Allow the stream to automatically adjust quality based on the viewer’s connection for seamless playback.
- Conduct Test Runs: Perform test streams to identify and resolve technical issues before going live.
Boosting Engagement and Interaction
Incorporate Interactive Elements
- Enable Live Chat: This allows viewers to comment and ask questions in real time, fostering community and engagement.
- Use Polls and Q&A Sessions: Engage your audience by soliciting feedback and encouraging participation during the stream.
- Integrate Call-to-Actions (CTAs): Prompt viewers to take desired actions such as subscribing, purchasing, or visiting specific pages.
Promote Your Live Stream Effectively
- Announce in Advance: Create anticipation by promoting your live stream across various channels ahead of time.
- Use Eye-Catching Thumbnails and Titles: Attract more viewers with compelling visuals and headlines.
- Engage on Social Media: Share live updates and snippets during the stream to attract more audience members.
For a deeper playbook on this, see 13 proven strategies to boost your live stream viewership.
Analyzing Performance and Making Improvements
Monitor Analytics and Feedback
- Track Viewer Metrics: Use analytics tools to assess view counts, engagement rates, and audience demographics.
- Collect Audience Feedback: Encourage viewers to share their thoughts and suggestions through surveys or comments.
- Identify Areas for Improvement: Analyze data and feedback to pinpoint and address weaknesses in your live streaming strategy.
Update and Refine Content Strategy
- Stay Relevant and Timely: Ensure your live streams cover current and exciting topics for your audience.
- Experiment with Formats: Try different types of content, such as interviews, tutorials, or behind-the-scenes, to keep your audience engaged.
- Consistently Deliver Quality: Maintain high standards in both content and production to build and retain a loyal viewership.
Top 3 Mistakes to Avoid When Embedding Live Streaming Video on Your Website
Ignoring Website Performance and Loading Times
Embedding live streams without considering your website’s performance can lead to slow loading times, frustrating users, and increasing bounce rates. Avoid this mistake by:
- Using Optimized Embed Codes: Ensure your embed code is efficient and does not contain unnecessary scripts.
- Leveraging Content Delivery Networks (CDNs): Distribute your content across multiple servers to improve load times and reliability.
- Testing Performance: Regularly monitor your site’s speed and adjust as needed to maintain optimal performance.
Neglecting Mobile Optimization
With a significant portion of users accessing content via mobile devices, failing to optimize your embedded live streams for mobile can alienate a large audience segment. To prevent this:
- Implement Responsive Design: Ensure your video player adapts seamlessly to various screen sizes and orientations.
- Test Across Devices: Check your live streams on multiple devices and platforms to confirm consistent performance.
- Simplify User Interface: Design intuitive and clutter-free controls that are easy to use on smaller screens.
Mobile viewers behave differently than desktop viewers — for a full breakdown, see mobile live streaming tips and trends.
Overlooking Legal and Copyright Considerations
Embedding content without proper permissions or ignoring copyright laws can lead to legal issues and damage your brand’s reputation. Avoid this by:
- Using Original or Licensed Content: Ensure you have the rights to all content you stream and embed on your website.
- Complying with Platform Policies: Adhere to the terms and conditions of your chosen streaming platform to prevent violations.
- Providing Proper Attributions: Give credit where necessary to respect creators and avoid infringement claims.
- Preventing Unauthorized Recording: A basic embed doesn’t stop viewers from screen-recording and redistributing your broadcast. If that’s a concern, see how to keep your videos safe from downloading.
Embedding a Live Stream vs. Linking to One
When it comes to sharing a live stream on your website, you have two primary options: embedding it or linking to it. Each method suits different goals and audiences.
Embedding a Live Stream
Embedding integrates the live video directly into your webpage using an embed code from a platform like YouTube, Twitch, or Inkrypt Videos. Visitors watch the stream without ever leaving your site.
Advantages of Embedding:
- Enhanced User Engagement: Embedded streams keep visitors on your site longer, reducing bounce rates and encouraging further interaction with your content.
- SEO Benefits: Search engines favor pages with rich, multimedia content, which can help boost your rankings and visibility.
- Customization: You control how the player appears — size, controls, autoplay settings, and branding.
- Integrated Experience: Visitors stay focused on your content and brand instead of navigating away.
Linking to a Live Stream
Linking provides a clickable URL that sends visitors to the stream hosted on an external platform. When a user clicks the link, the video opens on that platform instead.
Advantages of Linking:
- Simplicity: Linking is straightforward and doesn’t require any technical setup or code insertion.
- Reduced Page Load: Since the video isn’t embedded, your website’s loading speed remains unaffected.
- Low Resource Demand: Linking doesn’t strain your website’s bandwidth or server resources.
- Easy Sharing: Users can easily share the link, increasing its potential reach.
Which Should You Choose?
The choice depends on your goals. If you want to keep visitors engaged on your site and capture the SEO benefits of live content, embedding is the better option. If you need a quick, resource-efficient way to point people to a stream without affecting your site’s performance, linking might be more suitable.
Conclusion: Elevate Your Online Presence with Seamless Live Streaming
Embedding live streams on your website is a powerful way to engage your audience, showcase your brand, and drive meaningful interactions — while keeping the traffic, the data, and the monetization on your own terms. Whether you’re pulling the embed code from YouTube Live, Twitch, Facebook Live, or a dedicated platform like Inkrypt Videos, the process comes down to the same core steps: generate the code, paste it into your site, and make sure it’s secure.
Inkrypt Videos stands ready to support your live streaming needs with robust features, seamless integration, and exceptional performance. Empower your website with high-quality, engaging live streams, and watch your online presence flourish.
Ready to transform your website with engaging live streams? Explore the comprehensive solutions offered by Inkrypt Videos today and start connecting with your audience like never before! Sign up now for Free 30 Day Trial – No credit card required